Tag: crafts

  • Happy Birthday Ned-or-Evan

    Two of my son’s best buddies are a pair of identical twins named Ned and Evan. For a good six months after meeting them, he (and I) were unable to tell them apart. (I’m a twin myself, but look nothing like my sister). So Parker was always telling me stories about his adventures with his pals that went something like this: “Today, at recess, Nedorevan and I were playing knights, and then His Brother came over and….”

    So, in honor of Nedorevan and His Brother’s sixth birthday, I put together another book-and-homemade gift combo: freezer-paper stenciled shirst and a copy of  The Enormous Egg. It is a very sweet story about a boy raising a baby triceratops that’s all the more special to us because it takes place in New Hampshire, where we live.

    Their party is Saturday, in the middle of a very hectic few days that will include a Halloween parade, trick-or-treating at Main Street businesses in our hometown, a bonfire, fireworks and MORE trick-or-treating with Parker’s cousins. Oh, and the election on Tuesday which will mean a very long night of work for me!

  • New-and-improved Story Dice

    Back in December, I posted a tutorial for the story dice I made as gifts for some of my son’s friends. The basic idea is that you roll the dice and use whatever picture is facing up to tell a story.  I really liked how they turned out, but the packing tape transfer technique was quite labor-intensive, and required a color laser printer. I’ve been tinkering with other methods to transfer images so the wood shows through as if the pictures are printed or painted directly on the blocks.

    What I finally came up with is MUCH easier and faster: temporary tattoo paper!

    You can read my how-to article for AP here: AP Story Dice article

    And watch a step-by-step audio slideshow here: AP Story Dice slideshow

    The only drawback is cost. I bought the paper at Michael’s, and it was $9.99 for one sheet. ($6 using a coupon). But I was able to squeeze 48 images on one sheet, enough for eight blocks so that isn’t toooo bad.

    Once again, I used images by digital scrapbooking designer Kate Hadfield.


  • Robot Memory Game

    I don’t generally go crazy with my son’s Easter basket, and especially so this year given that our house looks like the day after Christmas thanks to generous friends and family who showered him with gifts after his recent surgery. But I did make him this little memory game featuring his current obsession: robots.

    My first thought was to use clipart, but I was worried I wouldn’t find enough or it would take forever to re-size each image. Then I thought of the perfect solution: a dingbat font! I found this cute, free set of robots at dafont.com. (The font is called “Lost Robo” by Slaager David Alexander). I then typed up a page of robots, using a different color for each one, at about 300 pt. to get each robot to be about 2″ tall.

    I then printed two copies on photo paper, glued a piece of blue cardstock to the back of each for stability and cut them apart. (Two robots got discarded after I unsuccessfully tried to use a corner rounder punch on the corners… anyone have a corner rounder punch they like? I hate mine. It always jams)

    I also printed a few robots onto iron-on transfer paper and added that to a strip of white fabric to label the little storage bag. My son enjoys playing a memory game on my husband’s iPhone, so hopefully he will like this low-tech version as well!

  • Felted Eggs

    Felted Eggs

    Even though I am a smidge more Irish than I am anything else, I’m going to let St. Patrick’s Day pass and move right along to Easter crafts. Here are some of the wet felted eggs I made last year. I used cheap plastic eggs as a base and felted over them. For the open egg, I carefully cut open the felted egg after it dried and removed the plastic.

    You can find the article and step-by-step instructions I wrote for AP HERE, and an audio slideshow HERE. (Ack… I HATE the sound of my voice! And despite the appearance of my wrinkled hands, I am not 80 years old. All that hot water makes for less-than-photogenic hands)

  • Be My Valentine (but keep your germs to yourself)

    I have no idea what we’ll do this year yet, but last year I made 20 tissue cozies for my son’s preschool classmates. I’m sure the kids would’ve preferred candy but figured the parents would appreciate the tissues during cold and flu season.

    Depending on how far you want to carry the theme, attach a card with the following message:

    “Knock, knock.”

    “Who’s there?”

    “Ah-choo!”

    “Ah-choo who?”

    “Ah-choose YOU for my Valentine!”

    Grown-ups may gag at the punny sentiment, but at least a tissue will be close at hand.

    You can click here to read the how-to article I wrote for AP. This really is a very easy project, but the written instructions make it sound more confusing than it is, so here’s my attempt at illustration via Photoshop.

    I’m hoping to find an idea for this year here:

  • Gifts for far-flung friends

    I just spent three days with my best friend who lives much, much too far away. In addition to the good company and good food, I also got a chance to see her family and inspect whether they REALLY liked the Christmas gifts I sent them. Though I’m sure it’s possible they only took them out for display purposes before I arrived, they did seem to genuinely like everything I sent.

    Here’s the Mommy & baby Black Apple dolls I made for my friend’s adorable daughter, featuring pigtails heavily inspired/directly copied from Larissa at mmmcrafts. If I was smart, I would’ve made the baby doll using the full size pattern and then enlarged the pattern to make the Mommy doll, but I didn’t decide to make the baby until after I made the Mommy. It was pretty tricky to make such a small version, and I ended up leaving the entire bottom edge of the body open to stuff it. (but here’s one smart thing: if you’re adding pigtails, leave the opening in the head where one of the pigtails will be, so when you turn the doll right-side-out, you can cover up your messy hand-stitching with a bow)

    And here’s the recipient with an armful of babies:

    I made my friend’s 6-year-old son a personalized space-themed pillowcase using my tutorial, and tooth pillow using Larissa’s darling pattern. It’s the same pattern I used to make my son’s tooth pillow, but this time I also made a little hat.

  • Charming

    cupcakes

    These are my first attempts at making polymer clay charms as gifts for all the little girls I know. There are soooo many cute projects in The Polymer Clay Cookbook, but I’m running out of time before Christmas to make more. I definitely want to try the bacon and eggs plate and some of the other savory dishes. I found them easier than expected to make. They require just tiny amounts of clay, and once you have the clay out it’s easy to make four or five at a time.  The hardest part actually was wrapping the wire to make the little jewelry attachments.

    pies

    In addition to the charms, I’m making some without the jewelry wire for my son, who I think will enjoy playing with them with all the little animal figurines he likes to set up.

  • Story Dice Tutorial

    stacked

    Aren’t these little story dice adorable? I used to think so, but making them turned out to be such a frustrating process that I’m no longer sure! I was inspired by this wonderful set at The Small Object  and this tutorial at Matsutake on transfering images to wood using glue and Mod Podge.  But I take full credit for coming up with the CRAZY idea that I could make a set for each of my son’s (TWENTY-TWO) pre-school classmates. In the end, I made eight sets, enough for his closest friends and a few other friends and relatives.

    bagged

    The images I used are digital scrapbooking elements by Kate Hadfield. I already had a few sets, and I love the painted style.  (And at the time, I justified the cost by figuring that if I divided it among 22 kids, it was a bargain! Ugh). I tried the Mod Podge technique but it didn’t work. Maybe I didn’t use enough glue or Mod Podge. Then I tried a rub-on technique using transparency sheets. No luck. Finally, I used this packing tape transfer technique I read about at How About Orange, and finally, that worked. (Note: this technique works with laser printed images and photocopies, but not inkjet prints)

    With all that out of the way, this really is an easy project, but it is not a quick one. I’m happy but not thrilled with the final result. Some images didn’t transfer as well as others, or the final coat of acrylic spray turned a bit cloudy for some mysterious reason.

    MATERIALS:

    wooden cubes (mine are 1.25 inches)

    a variety of 1-inch images (digital scrapbooking elements, clipart or hand-drawn)

    laser printer

    clear packing tape

    scissors

    small bowl of warm water

    Mod-Podge

    paint brush

    clear matte spray

    INSTRUCTIONS:

    1) Print images using a laser printer. I used Photoshop to format mine in columns because they will be covered later with strips of packing tape.

    printed

    2) Cover images with packing tape.

    3) Cut out images. (Alternatively, you can leave the sheet of paper whole and cut the images apart later. It’s easier to cut them now, but the next step — rubbing off the paper — is easier using the full sheet)

    taped

    4) Dip the tape-covered image in warm water to moisten the paper backing. I found that if I let them soak for more than a minute or so, the image didn’t transfer well. So just dunk it enough to get it wet.

    bowl

    5) Using your fingertips, NOT fingernails, rub the paper until it starts to come off. Continue wetting the paper and rubbing it until it is removed.

    rub

    6) The images will still have a bit of adhesive stuck to them, so lay them sticky-side up to dry. I noticed that pieces that often appeared totally clear turned out to have bits of paper still stuck to them that didn’t show up until they dried. You can go back and rub them off again or just tell yourself that a 5-year-old is not going to notice or care.

    backing2

    7) Apply a thin layer of Mod Podge to both the block and the image and adhere the image to the block. Repeat for remaining sides of the block. Allow blocks to dry, then seal with matte acrylic spray.

    glue

    My husband is hosting seven of our son’s friends tomorrow for a cookie-baking party. I’m giving the four boys sets of the story dice. The girls are getting polymer clay charms (pictures coming soon!). Those were much easier, and very cute, but I feel a little bad giving the boys the more “educational” toys and the girls jewelry. I hate to contribute to gender stereotyping…

  • Dinosaur Play Mat

    dino_mat_closed   dino-playmat-opener

    An article I wrote last year for CRAFT magazine has now been posted online! Click below to check out the step-by-step instructions, and downloadable templates:

    How to: Make a Dinosaur Play Mat

  • Halloween Snow Globes (minus the snow)

    Halloween Snow Globe
    We have been having an annual apple picking party and harvest dinner for about 10 years now, and for the last three or four, I’ve set up a craft table for the kids. I’d like to say that the projects have gotten more involved because the kids are getting older, which is true, but also I think I feel the need to “top” whatever we did the year before.

    The party was Saturday, and there were probably about 30 kids, most of them my son’s kindergarten buddies. I felt like every time I turned around I would see a PILE of boys rolling across the yard. It was a little hectic. But most of them did stop by the craft table to make these little Halloween-themed snow globes.

    They were easy to make, but definitely required adult help given the glass, glitter and water. I found several other tutorials online that suggested using floral clay to adhere the figurines. I tried it and it worked great for that purpose, but the glitter also stuck to the clay, which resulted in nothing but a few flecks of glitter swirling around after the first shake. Others also suggest using hot glue to adhere the figures, and seal the jars, but I figured hot glue plus 30 kids was asking for trouble.

    *** EDITED TO ADD: after a few days, even some of the figures that seemed secure started to float around, so I’m not sure what to suggest in terms of adhering them. I haven’t tried the hot glue idea, but if you’re making these with only a kid or two instead of 30, that might be the way to go ****
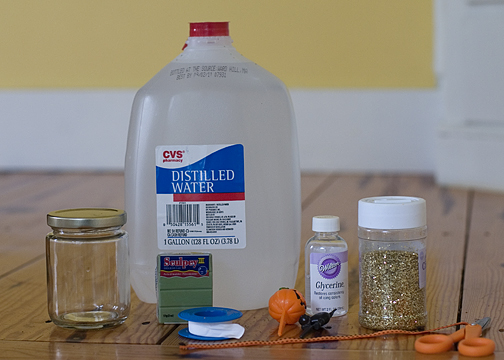
     

    Materials:

    _ glass jar with lid

    _ distilled water

    _ polymer clay

    _ thread seal tape (found with plumbing supplies at hardware stores)

    _ small plastic figurines (I used cupcake picks)

    _ glycerin (found with the baking supplies at craft stores)

    _ glitter (I also had a small set of autumn/Halloween colors but those went fast)

    _ ribbon

    _ scissors

    _ double-stick tape (not shown)

    Instructions:

    Halloween Snow Globe Tutorial

    1) Pinch off a small amount of clay and squeeze it in your hands for a few minutes to soften and condition it. I did this ahead of time for the party, and set the clay on a heating pad for a few minutes to warm it up. It’s possible I have very weak hands, but this took some muscle.

    2) Roll the clay into a ball. Insert figurines into the clay, and stick the whole ball onto the underside of the lid. Press firmly, building the clay around the figurine’s base. We had some trouble with the figurines coming un-stuck and floating around. Make sure the figurines aren’t spread out so widely that they won’t fit in the mouth of the jar.

    3) Add a small amount of glitter to jar.

    4) Fill jars with water almost to the top. Add a few drops of glycerin, which is supposed to make the glitter fall more slowly.

    5) Wrap thread seal tape around the rim of the jar. This stuff is a bit tricky to work with. It’s not really sticky, but it it twists on itself rather easily. My jar lids weren’t very deep, so I tried to wrap the tape only around the very top of the jars so it wouldn’t be peaking out from under the lid later. If your jar has a tight seal, you might want to skip this step.

    6) Carefully invert the figurines into the jar and screw the lid on.

    7) Use double-stick tape to wrap a ribbon around the lid to decorate if desired.