Calendar

November 2024
M T W T F S S
 123
45678910
11121314151617
18192021222324
252627282930  

Featured at:

craftsterBest of Craftster 2008

As seen on CraftGossip.com

Fan of:

the-long-thread-button

Christmas Gifts Unwrapped

I didn’t keep a detailed list, but I estimate I made more than 50 handmade gifts this Christmas, ranging from small ornmanents to a stuffed penguin for my son. There were a few things I never got around to finishing (or starting), but overall, I was very pleased. Starting early (July!) definitely helped.

Most of these gifts already were posted on my “hidden” holiday blog, but in case you weren’t a subscriber there, here are some of the projects:

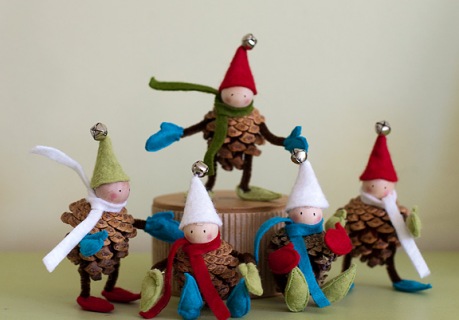
Pinecone Elves (from a Martha Stewart magazine article)

Reversible Fleece hat (the inside is UNC-themed fleece, for my college roommate’s little girl). Made using this great tutorial at From An Igloo. And even though the recipient lives in Tennessee, they got seven inches of snow on Christmas!

Polymer Clay food charms, from “The Polymer Clay Cookbook.” (actually, I forgot to give these away. Next year?)

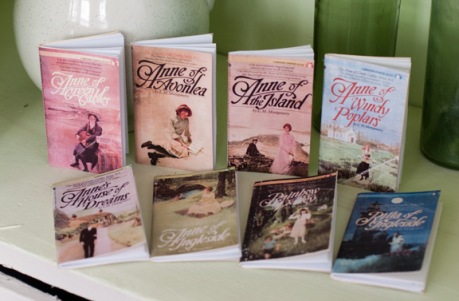
A set of mini notebooks. These actually were a wedding shower gift for my friend Beverley, the only person I know who loves Anne of Green Gables like I do. So much, that her shower had an “Anne” theme. I wasn’t able to attend, but I when I got the invitation, I dug through our very, very dusty storage crawl space to find my box of old books. Then I scanned the covers and made these little blank books for her. Each one is about 3X5″, with 20 sheets of paper. I printed the covers on laser photo paper, which ended up feeling very much like a real book cover. I cut up some old file folders and glued the covers on, and then sewed the books on my sewing machine down the middle. If I had had time, I would’ve gone out and bought some little notebooks, but once I got this idea in my head I was excited to start it. I think this same idea could be used for all kinds of gifts

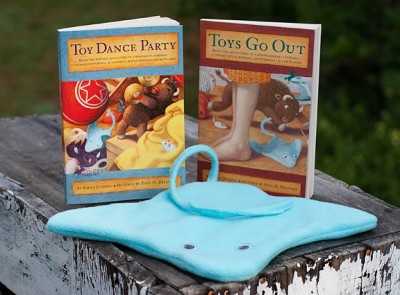
A stuffed stingray. My son loves these two books, and we’ve given them to several friends for birthdays and Christmas along with stuffed stingrays. I made up the pattern just looking at the picture. There’s actually two layers. A muslin inner layer that has some rice sewn into the ends of the flippers to give it some weight, and then the fleece outer cover.

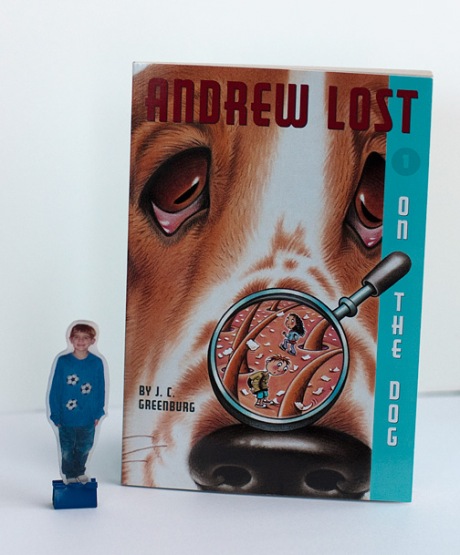
A shrink-plastic “miniature” for my friend’s 7-year-old, using a picture of him, to go along with a book about a boy who accidentally shrinks himself. I printed the picture on shrink plastic made for inkjet printers, and used a small binder clip with the metal prongs removed as the stand. Wouldn’t these be cute for personalized boardgame pieces?

I’m also adding this post to the link party at At Second Street:
Photobucket

Merry Christmas!

It’s almost Christmas Eve… who needs a drink?

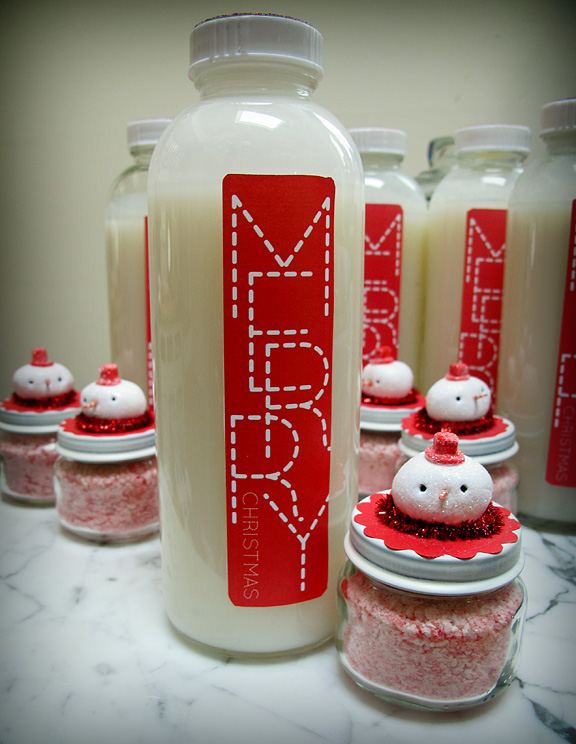
My husband hosted eight of my son’s friends for a cookie-decorating party this week. For the adults, he made batches of a “Christmas Cocktail,” which is served in a glass rimmed with crushed candy canes. To decorate the jars, I made polymer clay snowman heads that I first spotted in Holiday with Matthew Mead. I was thrilled to see that the very talented ornament makers at Swirly Designs were generous enough to provide a tutorial for making the adorable snowman in a really great free, downloadable magazine: Amy Powers’ Inspired Ideas. I only wish I had added eye hooks to a few of the leftover snowmen I have so I could turn them into ornaments. Next year!

The “Merry Christmas” label is a free download at Wee Life, though I altered the colors a bit. The tall jars are from some awful health drink my husband likes. And we have a ton of baby food jars because our elderly cat eats nothing but baby food, spoon fed to her. Poor thing!

Best wishes for a wonderful Christmas!

(and here’s the cocktail recipe)

CREAMY PEPPERMINT-COCONUT CHRISTMAS COCKTAIL

Start to finish: 5 minutes

Servings: 1

Ice

2 ounces cream of coconut

1 1/2 ounces light rum

1/2 ounce peppermint schnapps

1 1/2 ounces half-and-half

Fill a cocktail shaker with ice, then add all ingredients. Shake vigorously, then strain into a tumbler filled with ice.

Girlish Gifts

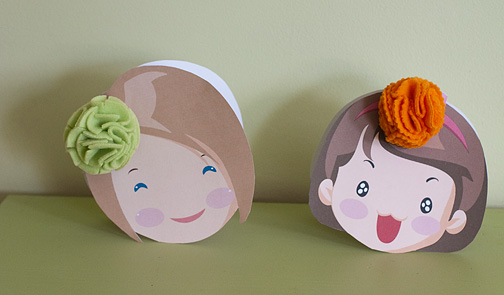
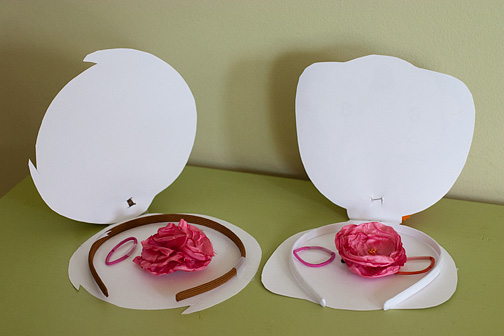
My cousin’s four little girls (ages 4-10) have been admiring some of the fabric flower pins I’ve made in the last few months, so I knew they would like these little gifts. I made them each a flower out of fleece and another out of silky polyster satin and made little sets that included a barrette, pin back, headband and hair elastic so they could interchange them.

I found these adorable clipart faces at the Microsoft Clip Art website. (I think I searched for “girl face.” Here is the image number for one of them: MC900445496. If you search for that, it should bring up one of the faces, and then you can click on “view similar images” to find the others).

I tweaked some of them a bit in Photoshop to change the hair color to match my cousin’s girls and then printed the faces on cardstock. I cut around the printed image and did the same on a blank piece of cardstock for the back. After taping the flowers and accessories to the inside, I taped the front to the back along the top  (hidden by the flower on the front) to make a card.

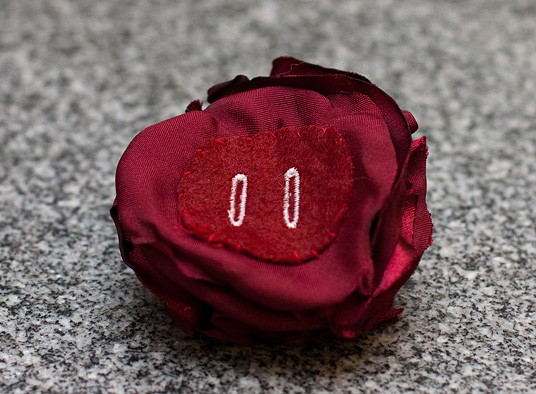
To  make the flowers removable, I cut out small circles of felt and then used my sewing machine to make two button holes, maybe 1/2 an inch apart. This created two slits that they can slide the pin back, barrette, headband, etc., through. (I then sewed the felt circle to the back of the flowers).  As someone suggested in a previous post, sewing a little bit of elastic to create a similar loop would work as well. I happen to have a very easy 1-step buttonhole function on my machine so it went pretty quick.

The girls opened their gifts (I also gave them each a neck gaiter) at a family party on Sunday and within a few minutes, they were wearing flowers in their hair and pinned to their dresses, so I think they were a success!

Giveaway WinnerS

In the spirit of the holidays, I decided to give away both of my items instead of one. The random number generator picked #2, so Ammie (who has made seven seahorses as toddler gifts this year!) wins the bag.

For the gingerbread guys, I had to go with my favorite comment because it just makes me laugh every time I read it.

Kristen wrote: “Both are cool, but I LOVE the gingerbread men! The creepiness is the best part! It’s almost like they might come to life and steal your silverware.”

Thanks for all the nice comments. After a while, I decided to abandon trying to go to all the other giveways and just started clicking on the blogs of my commenters. So much creativity out there! Speaking of which, my son is at his grandparents’ today, so I am determined to finish my Christmas projects!

“And the prettiest sight you’ll see is the HOLLY that will be…”

(Click HERE to go directly to my Sew,Mama,Sew! giveaway post)

Yes, I am still working on Christmas gifts, with all my favorite songs in the background… I was perhaps a bit delusional in thinking that if I started making gifts in July, I would be able to take December off from sewing and crafting. At this rate, I may take ONE DAY off. It’s time to admit that maybe part of me ENJOYS the last-minute rush. To wit, I got up this morning and painted 10 little polymer clay snowman heads before work.

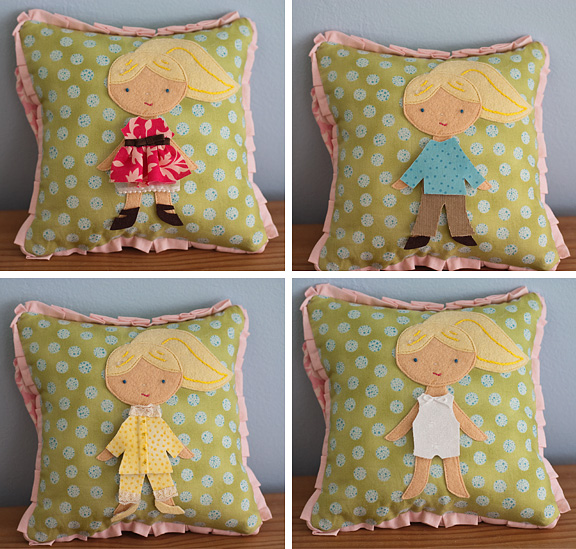
Here’s a gift for my best friend’s 3-year-old daughter (CONNIE: Close your eyes). It’s sort of a paper doll made out of fabric, with clothes that can be switched out, with a pouch on the back of the pillow to store all the pieces.
This was my first project from Wee Wonderfuls: 24 Dolls to Sew and Love, but I know I will make more. Each one is cuter than the next.

Of course, in my attempt to streamline the process, I ended up making things more difficult. I’m a great believer in making more than one of the same item at a time to cut down on time. For example, if I’m going to be getting out scraps of fabric for the little dresses, I might as well cut out two. Well, in this case, I decided that rather than sew the cotton print fabric to the felt backing for each piece, I would use fusible webbing, which would also keep the edges from fraying. This did work well in that the clothing looks great and it was much faster than sewing around each little piece. On the downside, it made the clothing a bit stiff, so it didn’t want to stick smoothly against the puffy pillow. I solved this problem by sticking bits of the rough side of some Velcro to each clothing item, but I’m wishing now I had just followed the directions. And now I’m stuck with a second set of clothing with the same problem.

This was a great project for scraps. I had a charm pack of some pretty prints that I used for most of the clothing. The yellow polka dot is a flannel bit I had leftover from a baby quilt I made eight years ago! So cute.

Have a HOLLY jolly Christmas…

(Click HERE to go directly to my Sew,Mama,Sew! giveaway post)

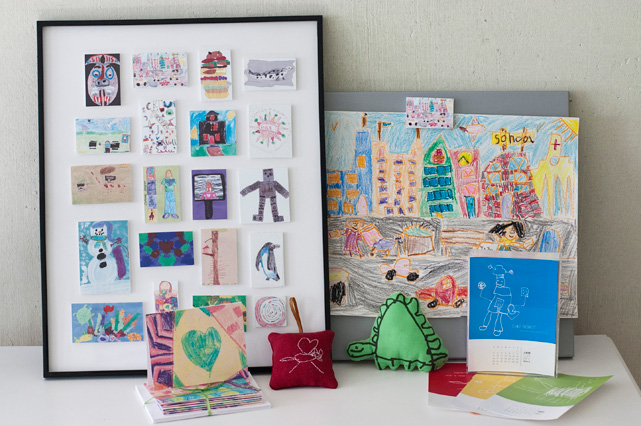
I know it’s getting late for new ideas for Christmas crafts, but here’s a bunch of stuff I made recently for an article I wrote for The Associated Press on turning children’s artwork into Christmas gifts.
My friend was kind enough to lend me some wonderful samples of her daughters’ artwork once I realized that my son’s “portfolio” didn’t have quite the range I was looking for.

All of these projects started with scanning the artwork. My favorite is the framed collection of mini-prints. It looks small in this picture, but the frame is 16″ X 20″. I know there are companies out there that will create similar collages, but they cost hundreds of dollars. This was a very inexpensive project. The others include notecards, calendars, magnets, stuffed animals and ornaments.
You can read the article and see more pictures here:
AP article on using kids’ artwork for gifts

Sew, Mama, Sew! Giveaway Day

I know nothing I give away this time will be as popular as my Lowly Worm doll from the last Sew, Mama,Sew! Giveaway… but I have so many Christmas presents left to make that there’s no way I have time to make another Lowly. I’ve already spent too much time fretting about what to give away, so I finally decided to post two options. The winner can pick which item he/she would like, the other will be for a Yankee Swap at a family party next weekend!

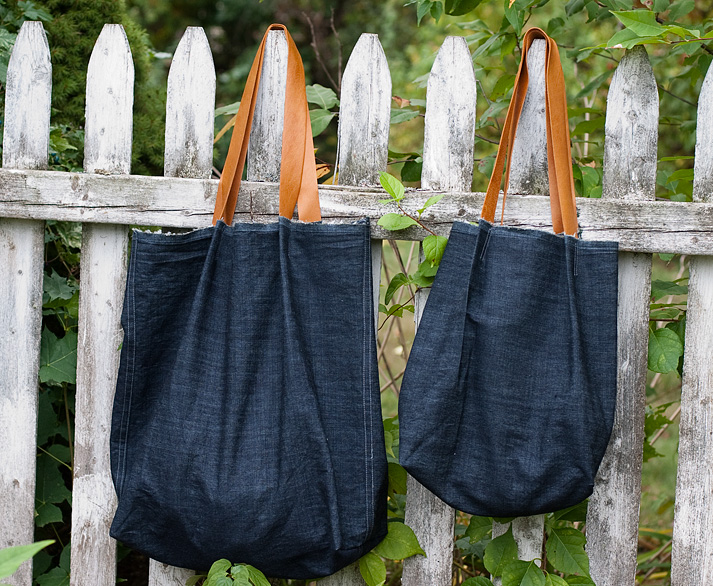
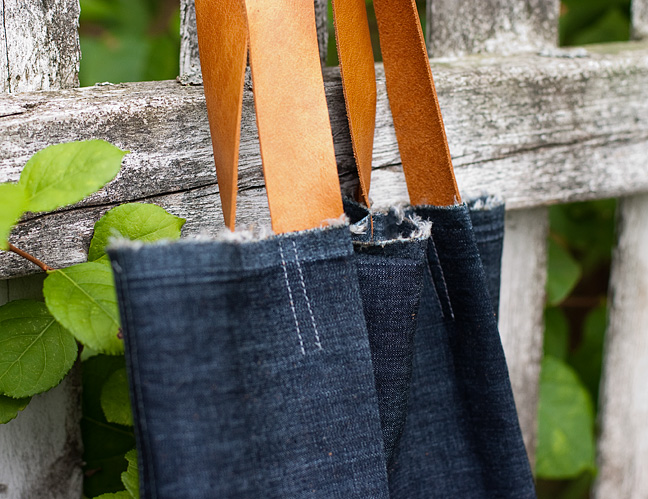
First up is a denim tote bag with leather handles based on this tutorial at Between the Lines. The photo shows two bags I made last summer. The actual bag I’m giving away is probably the size of the bag on the right,  about 12″ wide and 15″ tall.  It was too dark here today take a decent picture, so I figured the older picture was better.


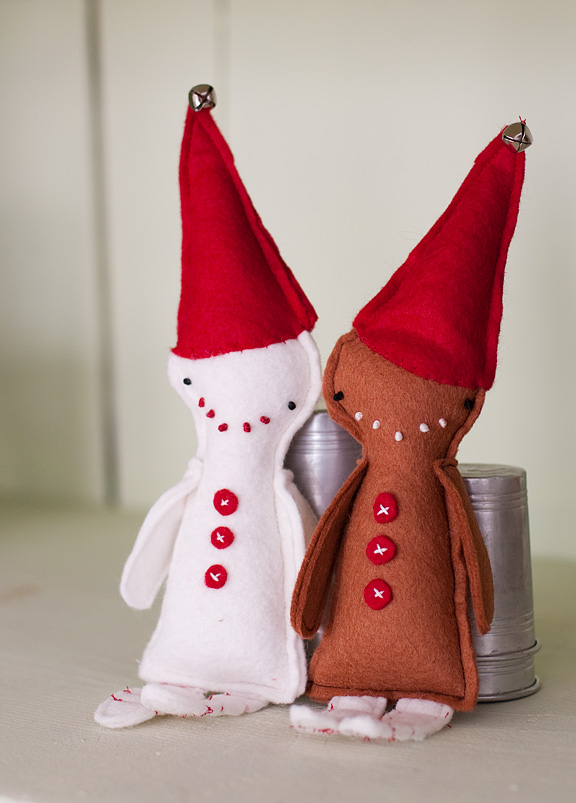
Next is a pair of felt gingerbread guys from “Fa La La La Felt.” You may recall that I posted about them before. I think they are cute, but my husband thinks they are a bit creepy looking. So I’m happy to send them to a home where they will be better appreciated!

In the spirit of the holidays, no need to jump through hoops for a chance to win. Just leave me a comment! If you feel like it, tell me about the best handmade gift you’re giving this year.

Comments will close Friday night and I’ll announce the winner Saturday morning. I will ship internationally.

Deck the halls with boughs of HOLLY

I would like to say I haven’t been blogging because I have been soaking up the holiday atmosphere and relaxing … but that’s not quite true.  While I have been enjoying lots of little Christmas-y moments with my family, I’ve also still been busy making lots of gifts, and work has been crazy. We put up our tree last weekend, and I decided to hang this felt ornament I made for Parker right next to a ceramic ornament my mom painted for me when I was 4 years old. Traditions!

The new ornament is from a pattern in “Fa La La La Felt,” which has so many cute projects.

And though I’m happy to leave the food blogging to my husband, I wanted to share this yummy recipe from Cook’s Country magazine. Basically, you melt chocolate in heavy cream and refrigerate it to create a ganache. Then you roll the ganache into balls, wrap them individually in plastic and then freeze. When you want a cup of hot chocolate, just unwrap one of the balls and plop it into a cup of milk, and microwave for 2 minutes. The result is a very rich hot chocolate, in the same time it would take to make it from a powdered mix. I experimented with tossing the balls in powdered sugar before freezing. I found that the sugar tended to get a bit absorbed into the balls. There’s a similar version posted at My Kitchen Cafe, though I just heated the cream in a sauce pan, turned the heat off, dumped the chocolate in and let it sit for a few minutes to melt it.

(Yes, our tree is directly behind one of our kitchen counters. Our living room has five doorways and a closet door, so there really is no good space for a tree. So the tree is basically in our kitchen.)

Haul out the Holly…

Will I sound like an ego maniac if I say I LOVE Christmas music, especially all the songs that include my name? This year, I’ve been very excited to listen to all my Christmas albums on my iPhone, and have been having fun creating new Christmas stations on Pandora. We had those cranked up yesterday when Parker and I pulled out all our Christmas decorations, including the fabric “paper chain” advent calendar I made last year.
This project is so quick, you could easily whip one up before Wednesday. Inside each link is a slip of paper with an activity to do each day leading up to Christmas.
Click on the picture above to go to my original post, which had a list of the activities I included, and links to the instructions in written form and an audio slideshow. (NOTE: The link to the article was no longer working, but it has now been updated)

For more holiday inspiration:

Thanksgiving Bunting

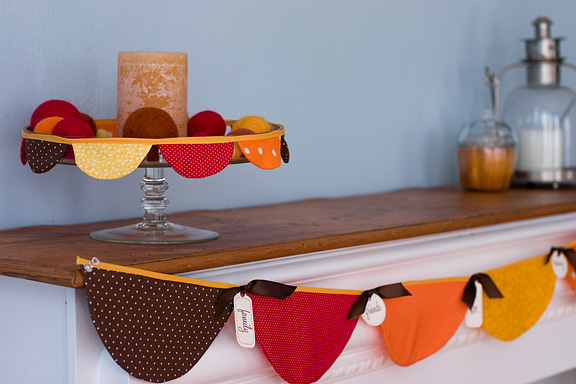
Here’s a Thanksgiving bunting project I made last year. I must confess, I have no idea where this bunting ended up, and we are not going to be home for Thanksgiving, so the chances of it actually getting displayed this year are slim! But this is a great project for any time of year. I tried to streamline the sewing process by starting with whole circles then cutting them in half. Click below for the how-to article and audio slideshow.

Thanksgiving bunting AP article

Thanksgiving bunting AP slideshow