Month: May 2013

  • If I only had an owl…

    This birthday gift would’ve arrived on time, instead of being a few days late! But like I always say, why not extend the celebration a bit?

    HP2

    This is a collection of Harry Potter-themed items for a friend who is turning 10 today. But Parker was so enamored with everything I made that he decided he wants a Harry Potter party when he turns 9 next fall, and has spent the last few days obsessively planning. We have a Harry Potter cookbook, and he decided to type a list of all the recipes he wants to include at his party. I finally stopped him when he was at about 65 recipes 🙂

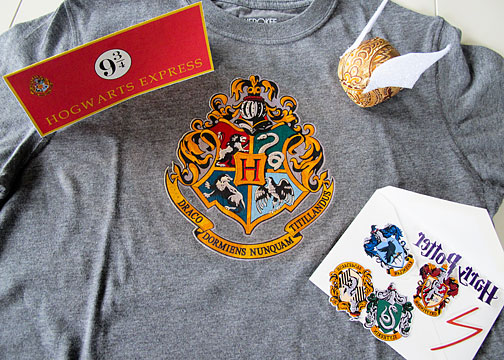
    The t-shirt was the easiest part of this project, though I had some missteps. The Hogwarts crest is a design I purchased from the Silhouette online store. For my first attempt, I printed it on regular iron-on transfer paper, but you really can only use that on white fabric. It didn’t show up well at all on the gray shirt. So I bought some iron-on transfer paper for dark fabric and tried again. For some reason, my printer was acting up, and the first time I printed it, I ended up with random black boxes printed across my design. So frustrating to waste a rather expensive sheet of transfer paper! But once it actually printed correctly, it was super simple to cut it out using my Silhouette and then iron it on to the shirt. (Note: I also duplicated the image in the Silhouette software and filled it in with gray, to make a background layer. That way, the parts that don’t get cut out — like around the top of the crest — aren’t bright white, and blend into the shirt a bit more.)

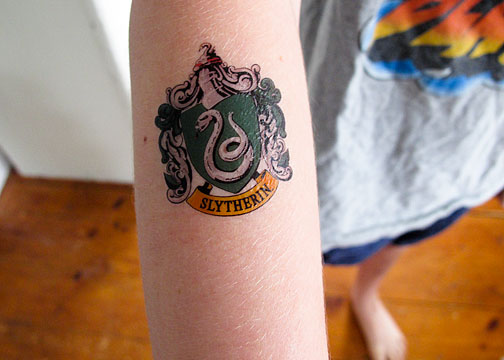
     I also used my Silhouette machine and designs I purchased to make the temporary tattoos pictured in the lower right-hand corner of the picture. (They look backwards, because the images are reversed and then appear the correct way once you stick them on). My mother-in-law had given me some of the Silhouette temporary tattoo paper for Christmas, and this was my first attempt at trying it. I did have to set my blade depth one notch up from the recommended cutting settings, but that could just mean that my blade is a bit dull. (I did not purchase the thunderbolt/scar … that’s just the letter “N” stretched a bit to look more like Harry’s scar!)

    I made a bunch, to fill up the whole sheet of paper, figuring we can use the extras at Parker’s party. And I let him try one out just to make sure it worked:

    HP3


    And finally, the Golden Snitch! I browsed around online and saw a ton of different variations, though not too many were made out of fabric. I decided not to try to match the golden/feathery wings that appear to be on the movie version of the Golden Snitch, and just went with sparkly felt wings. (I brushed some glue onto a piece of white felt and sprinkled it with glitter). I think the gold fabric was leftover from one of my husband’s food photo shoots long ago… I knew it would come in handy someday!

    HP1


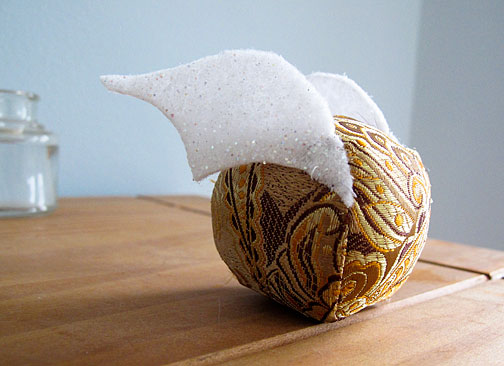
    For the ball, I used a pattern in Abby Glassenberg’s new book, Stuffed Animals: from Concept to Construction. I will write a full review later (if there is one thing I HATE it is seeing “reviews” of craft books written by people who have not actually tried any of the projects), but I was so happy to stumble upon this ball pattern. I really liked how Abby shows several different ways of making the same shape _ I have made ball-shaped things before using the “orange peel” method … sewing a bunch of peel-shaped pieces together, but I liked the simplicity of the “baseball” method and thought it was perfect for this project because it doesn’t involve so many seams.

    My first attempt did turn out a bit wonky, but when I tried again, and hand-basted the pieces together instead of pinning, it came out much better. I filled the ball with a combination of polyfil stuffing and rice, to give it a more bean-bag like heft. For Parker’s party, I’ll need to come up with a waterproof version, because he is planning a Quidditch match at our summer cabin, in the water!


  • Selfish Sewing


    wallet1

    This little project reminds me of the saying “The cobbler’s children have no shoes,” though in this case, it would be “The cobbler herself has no shoes.” For YEARS, I have been using a small, leather wallet that does not work very well at all. It has slots for cards, but when I actually put cards in it, the fold-over flap doesn’t snap. Yet I have kept using it, despite the fact that I know how to sew and have seen probably dozens of free wallet tutorials online over the years.

    I finally decided to do something about it on Sunday. My husband kindly took Parker to visit his mother for a few hours, so I figured, why not use that precious free time to make something for myself for a change?

    wallet2

    I used the Zipper Card Pouch tutorial at Craft Passion. I have to say, I found the directions pretty confusing. At several points, I had to zoom in on the photos to get a better idea. The most tricky point was the first step involving sewing the lining to the zipper. Miraculously, I did not make any major mistakes, but the whole time I was making it I was thinking, “I will never make this again. Too fiddly.”  Yet, now that I have a bit of distance from it, I’m starting to re-consider. (I think if I make another one, I would not use such heavy fabric/interfacing). I used quilting-weight cotton and heavy interfacing for the exterior, and leftover twill/canvas from my never-ending slipcover project for the lining.

    I didn’t have an metal zipper, which I think would look nicer, or any twill tape, but I stuck to my “use it or lose it” mantra and did not go out to buy new supplies. There is supposed to be a strip of twill tape on one side of the lining, to make a divider. I used strips of wide elastic on both sides instead, which I think would’ve worked great had I not inserted the lining pieces upside down (so the elastic is almost at the bottom of the pouch), and had I made the elastic just a bit tighter.

    I also did not have twill tape to cover the raw edges inside. I tried using narrow seam binding, but it was a bit too narrow given the thickness of the fabric layers. So I just zigzagged the raw edges, and that worked fine.

    wallet3

    All and all, now that I’ve used my wallet a bit, I do like it. It is smaller than my old wallet but more functional, with plenty of room for a stack of cards and a bit of cash. 


  • Quilts for Boston and Giveaway Winner

    Before we get to the giveaway winner, I wanted to encourage any quilters out there to submit a block to the Boston Modern Quilt Guild, which is making quilts for those injured in the Boston Marathon bombings. The deadline is May 24. (click on the image below for more details)

    quiltsforboston

    The guild is asking for quilts using the colors of the marathon: blue, yellow, white and gray.

    I used a pattern that was part of the Modern Block-of-the-Month sew-along at Sew,Mama,Sew! And what was great about that series is that all the blocks use the very same color scheme I was looking for!

    It turned out I did not have enough yellow fabric, so I ended up piecing together leftover charm squares from my camp quilt, plus a bit of polka dot fabric. I liked it so much I did the same for the blue pieces.

    bostonquilt


    Now… back to my giveaway. The random number generator picked #19, which was Susan, who said: “So pretty! I love peanut butter and chocolate. mmmm.”

    That actually is one of my favorite flavor combinations as well. I loved reading everyone else’s comments, too. There were quite a few flavors I have never seen here… like licorice! (I would not like that one, however).

    Thanks to everyone who entered! Susan, I will send you an email to get your contact information!


  • Giveaway!

    jewelryroll
    I completely forgot about Giveaway Day at Sew, Mama, Sew! until this morning, but lucky for you, I also finished up a little project last night. I actually was going to give this to my mom for Mother’s Day, but instead, it will go to one of you lucky readers! (Don’t worry, I will make another for mom).

    This is a jewelry roll from the book “One-Yard Wonders.” It has two zippered pockets, plus a ribbon that you can use for rings and earrings, to keep all your jewelry safe and organized when you travel.
    (jewelry NOT included!)

    jewelryroll2

    For those who are new to my blog, I hope you’ll come back and look around! As a bit of background, I’m a reporter for The Associated Press by day, crafter by night. Sometimes the two intersect and I get to write sewing and craft columns for AP, but my main job is covering politics and other topics in New Hampshire. My husband is the national food editor for AP, and we have an 8-year-old son who enjoys sewing as long as it involves jamming his foot down on the sewing machine pedal as hard as he can!

    For a chance to win, please tell me your favorite ice cream flavor. (Mine is coffee oreo… I used to work at an ice cream shop in high school, and that was one of the flavors there. I don’t come across it too often, though).

    I will close comments at 10 p.m. EST Friday, and will announce the winner Saturday. I will ship internationally.

    Please check out all the other great giveaways by clicking the image below:


    GiveawayDayMay6


  • Why crafting with a friend is a bad idea…

    If you want to have anything new to post on your blog 🙂

    OK, I can’t blame my entire lack of blogging on my friend and fellow crafter, Annmarie. But it is true that during our most recent get-together, I sewed a bunch of the squares for my postage stamp quilt together the wrong way and didn’t get nearly as much done as I thought I would. But I don’t mind a bit because we had fun, as always!

    So here is my unfinished quilt top … I think I’m about two-thirds done and I really like it so far!

    postagestampquiltx

    Since I don’t have any other projects to share, please indulge me in a bit of spouse promotion. My husband’s next cookbook is now available for pre-order on Amazon.com.


    lunchboxcover


    And here’s a little promotional video about it, featuring Rachael Ray. She has a new imprint with Atria Books, and Jason’s book will be the first to be published as part of that new venture.